
You may not realize this but, assuming you’re on Windows it’s possible to record Wwise’s Master Audio Bus output in your DAW.
(Likely it’s possible to do this with a Mac too – but I don’t own one, and don’t know what virtual audio device software is available.
This setup can be used for a variety of performance-based appications by setting up Soundcaster sessions and recording your results.
Software Setup
For this example you’ll need a DAW and Voicemeeter Banana. I used REAPER for my DAW, but theoretically it should work with any DAW that accepts a virtual device as input (as far as I know, they all do).
Voicemeeter Banana, if you’ve never used (or heard of) it before, is a virtual audio device that enables live mixing and DSP on the fly. Its advertised use is for video streamers who want to route and mix multiple audio sources at once (say a microphone, Skype call, and sound effect board). For our purposes, you’ll simply use the virtual in and out of Voicemeeter to re-route Wwise’s output into an input in your DAW.
Once you’ve downloaded Voicemeeter Banana, you’ll need to install it and then restart your PC in order to allow it to take control of your PC’s audio setup.
Using Voicemeeter
Once you’ve setup Voicemeeter, open it, and we’ll walk through the surface-level basics of how it works.
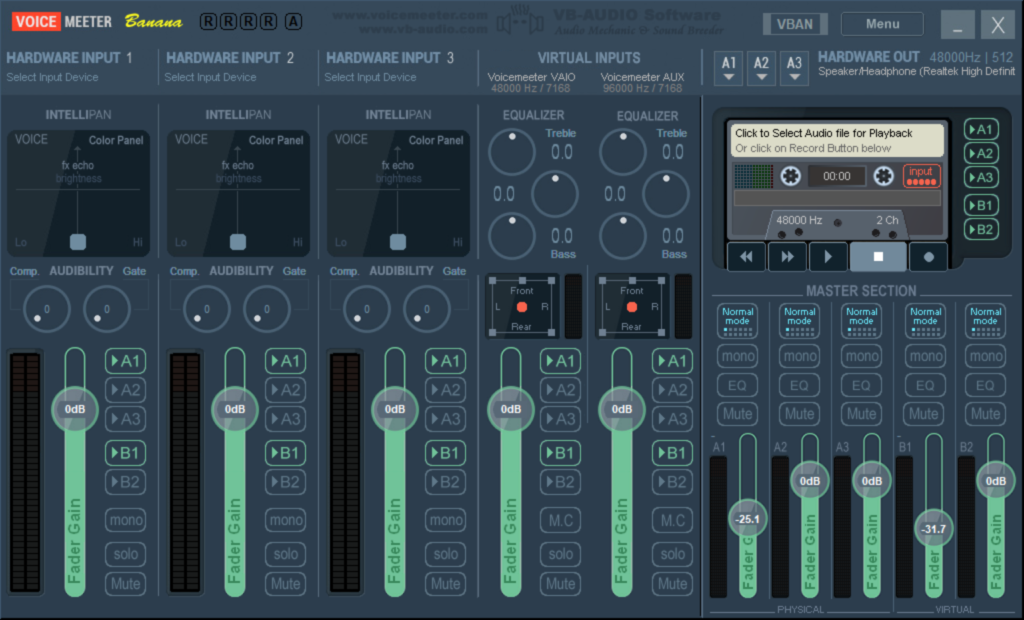
As you can see above, Voicemeeter Banana will accept 3 hardware audio inputs, and has a section for virtual inputs (labeled VAIO and Aux). Additionally you can play back an audio file from the software, and it gives you both a physical and virtual master section. Clearly, there’s a tremendous amount of potential for routing your various pieces of software and hardware.
For our uses, we only really care about the VAIO channel.
You’ll see it gives you simple 3 channel equalizer and panner (if you care to use them) and all the buttons on the side of the fader are your routing options. You can route to any number of physical or virtual busses at one time.
When you look at the top of the VAIO channel, you will see what sample rate the channel is locked to. You can see the same in the upper right hand corner near hardware out. Make a mental note of these, as if they’re different than your DAW’s sample rate, you’ll run into problems later.
To change the sample rate settings, you can go to the start menu, navigate to “VB Audio” and open either of the “Control Panel” applications (there’s one for VAIO and one for Aux). In the options menu of either control panel you can reset the sample rate and latency of that virtual channel – doing so will require a restart of your system.
Before jumping to Wwise, make sure to left click on your windows audio output (the speaker icon near your clock in the task bar) and make sure your playback device is Voicemeeter Input (VB-Audio Voicemeeter VAIO). If you don’t do this, you will not get audio.
Routing Wwise
The Wwise hardware routing window will be different depending on what version of Wwise you’re running. For example…
To route Wwise away from your hardware output and to Voicemeeter on Wwise 2017.1, go to File > User Preferences. Under the Sound Engine section (shown below) you’ll see a dropdown for “Output”. Under that dropdown, choose “VoiceMeeter Input (VB-Audio VoiceMeeter VAIO)”.
To route Wwise away from your hardware output and to Voicemeeter on Wwise 2017.2.4, go to Audio > Audio Preferences. You should see a window like below:
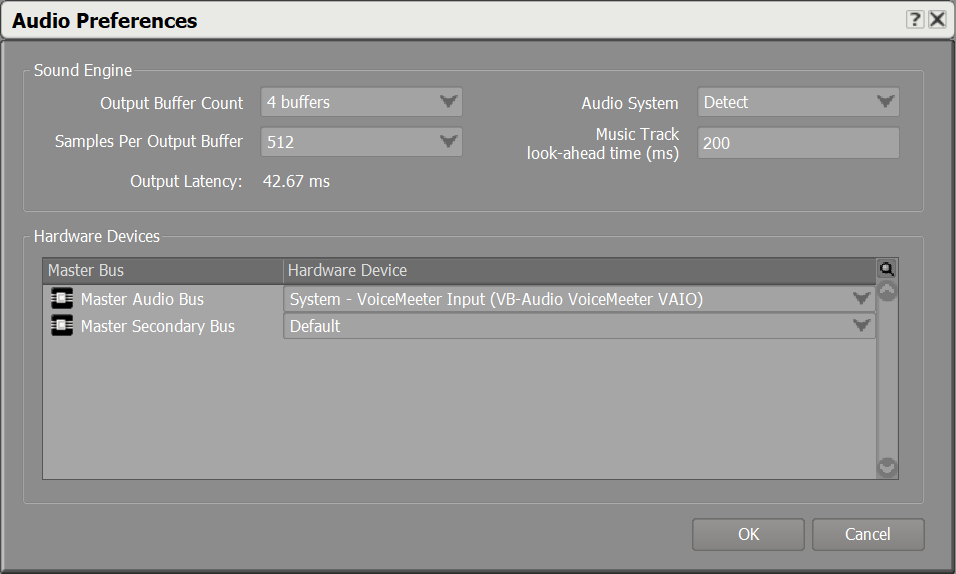
You can see that each master bus can route to a different hardware device. In the case above, I’ve switched the Master Audio Bus away from default and directly to Voicemeeter Input.
At this point, you can play a sound back in Wwise and you should immediately see VoiceMeeter’s VAIO channel getting input.
Routing your DAW
Every DAW is going to be a little different regarding exactly how to route the VAIO channel. Here, I will be showing you how to do it with Reaper – as that’s my personal DAW of choice.
In Reaper, go to Options > Preferences and go to your Audio Device Settings. Below, I’ve made mine match the Voicemeeter Hardware Out (WDM – this is what Win XP used for audio), and made sure my sample rates match.
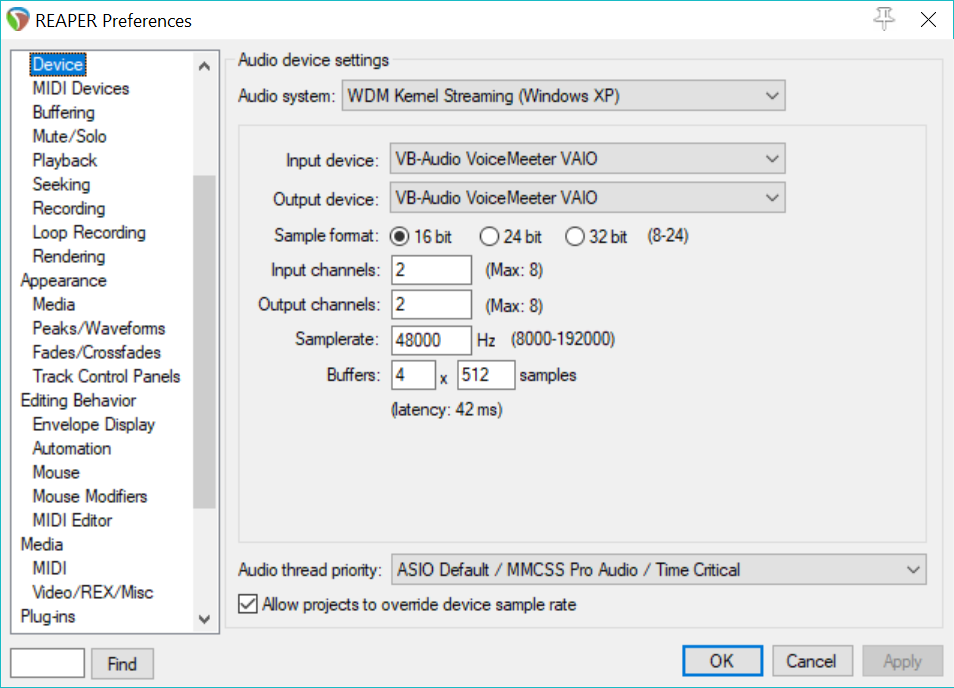
After this, if you get no errors (Reaper may get mad about sharing an audio device, and if so you will need to experiment with your specific setup), you can create a new audio track and setup the input routing.
Testing Your Setup
At this point, you can either pull up an audio file for playback, or trigger a longer file in Wwise so you can jump around without having to restart it.
If you’re successful – you should get sound and metering on the VAIO track. In the default setup, you’ll also see that track routed to a virtual bus, which then routes to your DAW. At this point your DAW routes back to Voicemeeter, and then to your hardware output.
You can control the input level, therefore, from either the VAIO channel itself or from the virtual bus. You can also route completely separate audio programs together using both the VAIO and the Aux channel – sending them all to your DAW to record together.
Do keep in mind, the complicated part of this setup is making sure that Voicemeeter and your DAW are using the same device settings and sample rates. If you have trouble, it may require some experimentation on your part to figure out exactly what’s going on.
Good luck!
Copyright 2016-2021, NIR LLC, all rights reserved.