
Let’s piggyback off my previous post where I introduced you to making your first plugin with JUCE.
Today you’re going to end up making a random noise generator complete with a level slider. Though it may not feel like the craziest or coolest thing you can concoct – completing this project will do a great job of introducing you to the basic core concepts of JUCE itself.
Make sure you’ve done the “Hello, World!” project before starting this. That will ensure you have everything correctly installed and working so you don’t run into serious headaches. Also keep in mind, the noise we’ll be generating won’t be true white or pink noise – use this for illustration and learning, not for mixing!
Let’s get started!
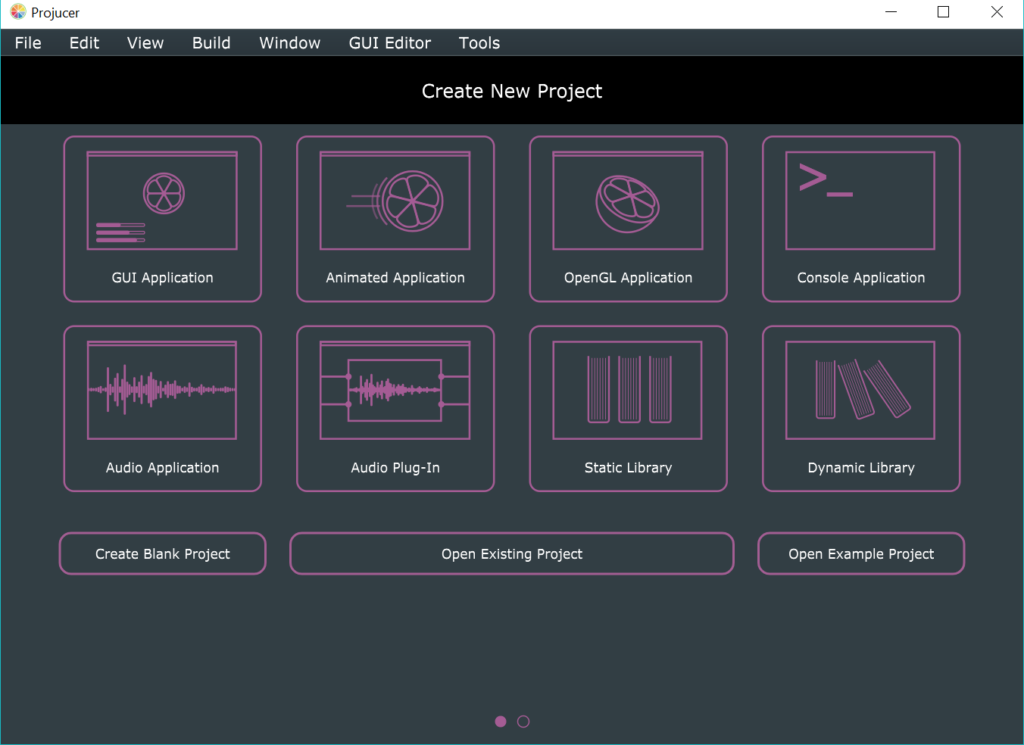
As we did before, you want to start by opening up the Projucer. This time we’ll be selecting Audio Application as our starting point out of the options you see below:
Once again, you can go through the settings and add things like “Company Name”, “Website”, etc.
Once you’re all set and ready to go, hit the Visual Studio icon within JUCE to save the project settings and move to Visual Studio.
You’ll notice pretty quickly that the audio application template is fairly different than the template for an audio plugin. No header files get built, for example.
If you look within the main MainComponent.cpp file, you should pay attention to five main functions:
- prepareToPlay()
- releaseResources()
- getNextAudioBlock()
- paint()
- resized()
prepareToPlay()
This function is called just prior to the actual audio processing. This function is used to initialize any data that should live in the audio thread, not the GUI.
releaseResources()
This function is called once our audio is finished processing. This is where you would destroy any objects created during the audio processing.
getNextAudioBlock()
Put simply, this is where the meat and potatoes of our audio processing lives.
paint()
The paint function is used for drawing all of our GUI code.
resized()
The resized function should handle all of the positioning of your GUI components. Thus, when the user resizes the window, your sliders, buttons, etc will all re-position themselves accordingly.
Writing the app
Now that you’ve browsed over the generated code, it’s time to get building!
Let’s take this step by step, and I’ll instruct you on both what to write, and what the code means.
MainContentComponent()
MainContentComponent is the object everything else within our app is a member of. The most basic reason you need to be aware of it for now is as it’s where you set the GUI size and your number of audio channels is set.
My final code looks like this:
[code language=”cpp” light=”true”]
MainContentComponent()
{
setSize (400, 100);
// specify the number of input and output channels that we want to open
setAudioChannels (0, 2);
}
[/code]
This code should be pretty visually straightforward. In case it isn’t, setSize is setting the width and the height of your GUI. setAudioChannels is declaring the number of input and output channels you’re using on your sound card. In this case, I don’t need any input channels, and just 2 output channels.
prepareToPlay()
The only thing I’ve used prepareToPlay for is to “seed” our random number generator.
If you’ve never used random numbers in programming, generally there is a pre-made function you can use to generate random numbers. However, most often these numbers are “pseudo-random” or, “not actually random”. Instead, they usually follow a sequence based off a starting point.
The “seed” we’re giving to our random number generator is that starting point. Here’s how the code looks:
[code language=”cpp” light=”true”]
void prepareToPlay (int samplesPerBlockExpected, double sampleRate) override
{
random.setSeed(Time::currentTimeMillis());
}
[/code]
Don’t worry if you directly copy this code and immediately get errors. For it to work, you have to create an object of the Random type. My Random type variable just happens to be called “random”.
You can see we use the setSeed function to seed our random number generator with Time::currentTimeMillis(), which returns to us the current time in milliseconds.
getNextAudioBlock()
Here’s the fun one, where we do all our audio processing code. Let me throw all the code at you, and we’ll again break it down line by line:
[code language=”cpp” light=”true”]
void getNextAudioBlock (const AudioSourceChannelInfo& bufferToFill) override
{
// Right now we are not producing any data, in which case we need to clear the buffer
bufferToFill.clearActiveBufferRegion();
const float level = (float) levelSlider.getValue();
for (int channel = 0; channel<bufferToFill.buffer->getNumChannels(); ++channel)
{
// Get a pointer to the start sample in the buffer for this audio output channel
float* const buffer = bufferToFill.buffer->getWritePointer(channel, bufferToFill.startSample);
// Fill the required number of samples with noise between -0.125 and +0.125
for (int sample = 0; sample < bufferToFill.numSamples; sample++)
{
const float noise = random.nextFloat() * 2.0f – 1.0f;
buffer[sample] = noise * level;
}
}
}
[/code]
Okay, here we go!
First, bufferToFill.ClearActiveBufferRegion() is pre-exisiting code provided by JUCE to ensure that no random noise comes out of your program (ha!)
From there, we create a float variable that pulls in the current value of our volume level slider. Don’t worry if you get errors when you write this – we haven’t created the slider yet!
Following this, we enter our first for-loop. This loop is designed to grab each of our channels in sequence (so we’ll loop through it twice). Once in this loop, our program grabs a number of samples to use as a buffer, starting with the “starting sample” which is given to us as bufferToFill.startSample.
From there we transition into our second for-loop, which iterates over the number of samples in the current buffer (first the left channel’s buffer, then the right’s). Within this loop, we generate a new random number (random.nextFloat) using a bit of math to keep the number between positive 1 and negative 1.
Aside: we are 100% certain to get a number between positive 1 and negative 1 because random.nextFloat only gives us a float between 0 and 1. Our extra math is to extend the bounds out to a maximum of positive 1 and a minimum of negative 1
After we have our random number, we multiply it by the current value of our level slider. Then we assign the current sample equal to that random number.
That’s all it takes for audio processing! You’ve generated random noise!
releaseResources()
I have awesome news for you – you don’t need to touch this function. We don’t have resources to release!
paint()
Here’s the code for our paint function:
[code language=”cpp” light=”true”]
void paint (Graphics& g) override
{
// (Our component is opaque, so we must completely fill the background with a solid color)
g.fillAll (getLookAndFeel().findColour (ResizableWindow::backgroundColourId));
levelSlider.setRange(0.0, 0.25);
levelSlider.setTextBoxStyle(Slider::NoTextBox, false, 100, 20);
levelLabel.setText("Noise Level", dontSendNotification);
addAndMakeVisible(levelSlider);
addAndMakeVisible(levelLabel);
}
[/code]
Here g.fillAll is pre-written by JUCE to fill the screen with a solid color.
From here we simply set the minimum and maximum values of our level slider, then set its “text box style”. Usually there is a text box indicating the slider’s current value, so I chose to set Slider::NoTextBox instead – however you still need to set a size.
levelLabel is another variable we’re about to build that simply says “Noise Level”. We don’t need a notification of any kind either, hence the 2nd parameter.
The addAndMakeVisible chunks make it so our GUI elements actually appear on our app!
Again, don’t worry when this comes up with a bunch of errors – we’re fixing that next!
Creating your variables
Now at the very bottom of your code you should see a line that says
private:
Private variables and functions are stored under here. This is where our missing variables need to go. Your code should look like this:
[code language=”cpp” light=”true”]
private:
Slider levelSlider;
Label levelLabel;
Random random;
[/code]
At this point, all of your previous errors should go away.
Go ahead and build your app at this point (make sure you’re building to the Release target too!), and run it!
Your slider should be at zero upon starting the application, and to test it pull the slider to the right. If you get noise, congratulations!! Way to go in making your first real audio application!!
If you don’t get noise and are still having trouble, you know where to find me – @adamtcroft
Copyright 2016-2021, NIR LLC, all rights reserved.