
The next few times we chat, I’m going to be sharing more and more with you about my upcoming guide on ChucK programming.
In the guide, I explain what ChucK is, why you want to use it, why use it versus other languages like Sonic Pi, CSound, SuperCollider, Pd, etc.
But today – I want to skip all of that. Instead, I’m going to give away the farm.
Honestly I think it’s more fun and more eye opening if I simply dive right in with you and have you make your first sounds with ChucK. Today.
So, that’s what we’re going to do. Below is an early chapter, completely unedited, that walks you through making your very first sounds with ChucK. Is it enough information for you to do incredibly mindblowing things with ChucK? No – you’ll have to buy the guide for that when it goes up for presale.
But, I guarantee it’ll whet your appetite and give you that “Oh, this is cool!” moment when you make sound by typing words for the first time.
To complete the tutorial below you need to go to http://chuck.cs.princeton.edu/release/ and download ChucK for your platform (it will work on Windows, Mac or Linux). Once that’s done, start the program “miniAudicle” – that’s the development environment that comes with ChucK.
Alright, let’s do it. If you have any questions about the guide, feel free to email me (me@adamtcroft.com).
Running Your First ChucK Program
And finally – we’ve reached the fun part.
Now that you’ve downloaded and installed ChucK and the miniAudicle – let’s fire up the latter and walk you through the basics by having you write your very first noise-making program.
Once you open up the miniAudicle, you’ll see three different windows.
- miniAudicle
This is the main window you’ll be working with as you go about writing ChucK programs. The top of the window provides the traditional drop-down menus for settings, windows, and the like. You’ll also see buttons entitled “Add Shred”, “Replace Shred”, “Remove Shred”, “Remove Last Shred”, and “Clear Virtual Machine”. Below that is a tabbed interface where you will actually code your ChucK programs. - Console
This window serves as the console output for ChucK programs. Any errors will be displayed here, as well as any logging/debugging statements that you use in your program. - Virtual Machine
Part of the way ChucK works is by utilizing a virtual machine. Instead of utilizing your computer’s resources directly, ChucK separates itself by using a virtual machine interface. This means that, at runtime, it is likely less efficient than other audio systems – but for our case, it’s perfectly suitable and shouldn’t mess up the rest of our system. Within this window you can see if the virtual machine is running (you can’t execute your program if it isn’t), how long it has been running, and what ChucK files (shreds) are currently running on the virtual machine.
Now, your first task is to click the “Start Virtual Machine” button on the Virtual Machine window. ChucK may hang for a second or two, and then you should see something like the output below in the Console window.
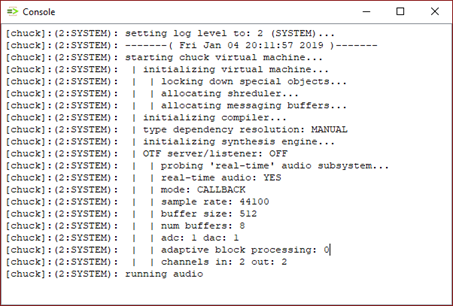
If you’ve gotten to that point successfully, then congratulations, ChucK is running properly!
In your miniAudicle window, type the following:
<<< “Hello, ChucK!” >>>;Then save your program as “HelloChuck.ck” and press the “Add Shred” button at the top of the miniAudicle. In the Console, you should have something similar to the output shown below:
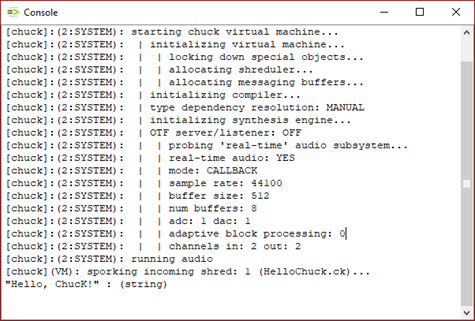
If you see “Hello, ChucK!” at the bottom of your console – you’ve succeeded! I know it seems stupid, but we’ve just proven that ChucK is working properly on your system and we can write debug output if we have any issues – so be excited and give yourself a pat on the back.
Now, onto the fun stuff.
Making Sound
Now that you know how to print text to the console with a debug statement (that <<< “text here” >>>; statement), let’s get on with making some sound, shall we?
Modify your “HelloChuck.ck” file to look like the following:
<<< “Hello, ChucK!” >>>;

SinOsc oscillator => dac;

440 => oscillator.freq;
.3 => oscillator.gain;

2::second => now;
First, save and press the “Add Shred” button to see what happens.
Cool, right?! You should’ve gotten 2 seconds of a sine wave at 440 hertz!
Now, let’s walk through this together line by line.
This is where ChucK becomes immediately a little polarizing, because the syntax (or “code grammar” – how it is written) is quite drastically different than any other language.
For those of you who’ve never programmed before – this won’t be a major issue until you’re trying to learn a different language. For the rest of you who have programmed, this will take a minute of getting used to.
After our “Hello, ChucK!” line, you see
SinOsc oscillator => dac;In normal programming syntax, this would roughly mean “make a variable of type ‘SinOsc’ and set it equal to ‘dac’ – whatever that is”.
However, that’s not what this means at all. Instead, get out of any programming conventions you’re used to and dive deep into your audio professional brain. I know that’s a weird mindset to get into while programming but trust me.
The above line is indeed saying we want an object of type ‘SinOsc’ – in fact, you should be extremely familiar with what that is – a sine wave oscillator! So, the first two words are you saying you want to create a sine wave oscillator and assigning “oscillator” as the name of your sine wave oscillator.
Now, the fun part.
The => operator you see next is where the ChucK language gets its name from. This is the “ChucK” operator. I like to think of it as “send to” or “connect”. That will make more sense in a moment, in context.
“dac” is a special keyword in ChucK that – as an audio professional – you should understand well. This simply means “digital to audio converter” and is essentially shorthand for “your sound card”.
So, in whole, this entire statement means “create a sine wave oscillator named ‘oscillator’ and send the output of the oscillator to my sound card”.
Get it?
A super easy way to visualize this in your mind is to imagine the ChucK operator (=>) as a patch cable. Imagine you have a box or module that is just a sine wave oscillator, and a speaker. The ChucK operator (=>) is your patch cable that connects the two!
Once you understand the “ChucKing” concept, the entire language becomes much easier to grasp. As I said – if you’ve programmed before, this is a different paradigm to walk your mind through. But if you’re coming from an audio-only background, you’re probably breathing a sigh of relief with how easy this is!
Let’s look at the next two lines:
440 => oscillator.freq;
.3 => oscillator.gain;
At this point, we’ve created our sine wave oscillator, but given it no properties to speak of. If we were to turn on our figurative oscillator, it wouldn’t actually do anything because we’ve assigned it no properties.
With the above two lines, we’re assigning 440 hertz to the oscillator’s frequency and setting the gain level on the oscillator to “.3”
In ChucK parlance we’re saying “ChucK 440 hertz to our oscillator’s frequency” – so you can see why, in my mind, “send 440 hertz to our oscillator’s frequency” is pretty synonymous and easy to understand.
The reason why I’ve chosen .3 as a gain level here is simply so you don’t blow out your ears or speakers. ChucK operates on a gain scale of 0 to 1, where anything above 1 is clipping. If you send 3 different sine wave oscillators at a gain level of .5 to your dac (soundcard), therefore, you’d be clipping your output (with a total output of 1.5).
Lastly, there’s this line:
2::second => now;These are two different sets of ChucK keywords separated by the ChucK (=>) operator. Essentially, this means “play for 2 seconds”. If you change the number 2 to another number, you can see how this works. You can ChucK various different durations to ‘now’, including milliseconds (ms) and samples (samp). If you replace the word ‘second’ with either ‘ms’ or ‘samp’ you can see how that works!
Pretty cool – huh?! Congratulations, you’ve written and executed your first ChucK programs and you’re already making sound! Feel free to mess with this a bit and send different frequencies to your oscillator and play it back for different durations. Don’t worry if you get bored quickly – we’ll expand on this really, really soon!
Get on the Wait List
Congratulations on making your first sine waves with your bare hands and no plugin! Pretty crazy, right?
Well, that’s just scratching the surface. In the guide we’ll go through playing back your own audio files, modifying their playback, randomizing variations, modulation, ChucK’s custom instruments, using MIDI, OSC, and more.
If this made you stoked and surprised you could handle it – then this guide is for you. For now, I’m not letting you put your money down. That will come soon. But if you’re super interested in more, sign up for the wait list below.
By signing up, you’ll be added to my main email list. If you’re already on it, sign up again as it will update your profile to tell me about your interest and I can email things specifically to you.
Copyright 2016-2021, NIR LLC, all rights reserved.