
At the end of last week, the kind people over at Audiokinetic hooked me up with early alpha access to Wwise 2017.1 – which is the build with the Wwise Authoring API & Spatial Audio updates (Thanks, Mike, Max, Bernard & Benoit!)
I’ve gotten approval that I can talk about what I’m playing with – so that’s exactly what I’m going to do! As I learn, build, and understand new things I hope to continue to provide my perspective on it and help you learn how to use it.
If you’re not a programmer, I hope to show you what possibilities you can pull off to improve your workflow too. So don’t ignore the post, rather skip around it to the parts that are relevant and make your brain freak out.
Since I just got WAAPI up and running with Node.js on Windows – I want to show you exactly how to do that and the very first thing I imagine that could be useful for you.
Getting Started
First, if you’re going to follow along and actually build this you’re going to need a few things:
- Wwise version 2017.1 – as of this writing it’s in Alpha 2. You can request access here. Early access requires you register a project. If you don’t have one I suggest you ping Mike D or Audiokinetic and say “I heard about WAAPI from Adam, would it be okay if I got access?”
- Node.js installed on your machine
- A text editor – I like Notepad++
Installing Wwise + SDK
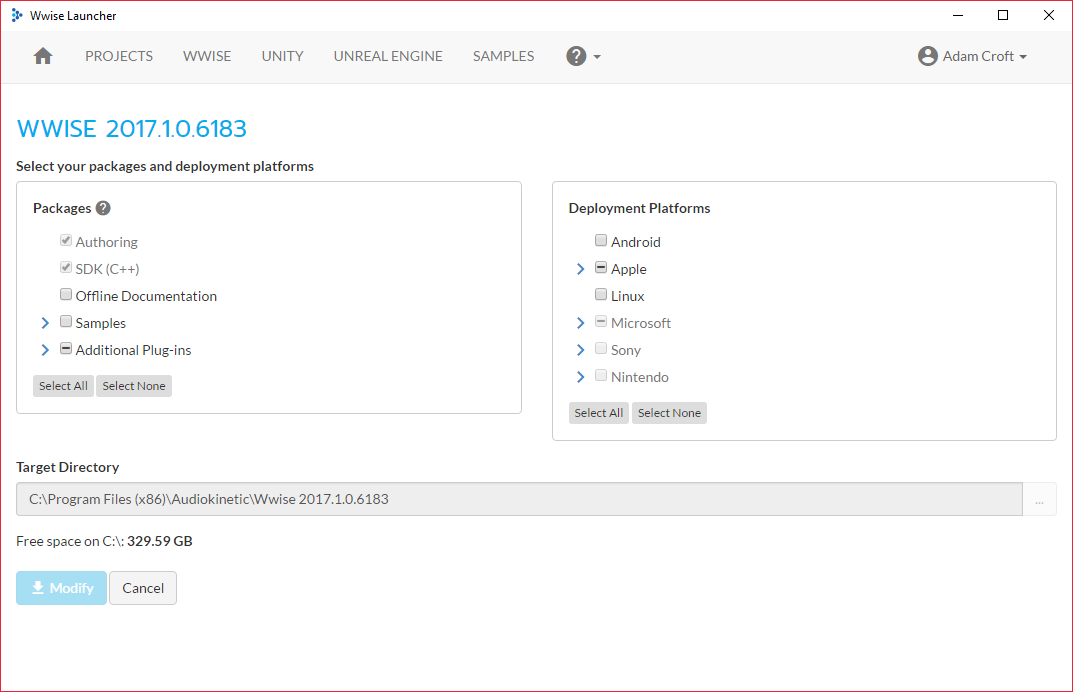
When you get to the install options of Wwise 2017.1 you need to include both “Authoring” and “SDK”.
“Authoring” gives you access to the Wwise Authoring API connection (needed to just run WAAPI apps). “SDK” gives you extra samples and information to aid in actual app development. The SDK will probably take a bit to download, so set it and forget it.
Double checking your Node.js install
Once you download and install Node.js, open up Windows Powershell and type:
node -v
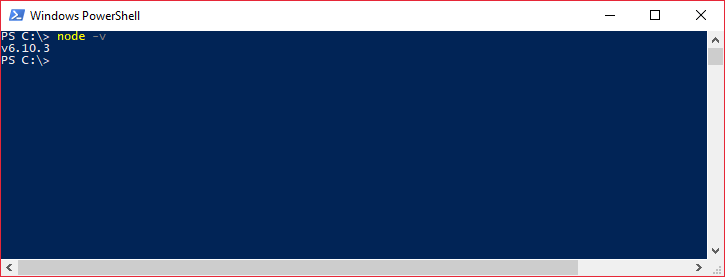
If you have Node.js installed correctly you’ll see something like the above, where Node spits out a version number at you.
Your first Wwise Project
Next, start up Wwise and create a new project. Once in the project I’d make a few empty Sound SFX objects for later and name them “Test_01”, “Test_02”, and “Test_03”.
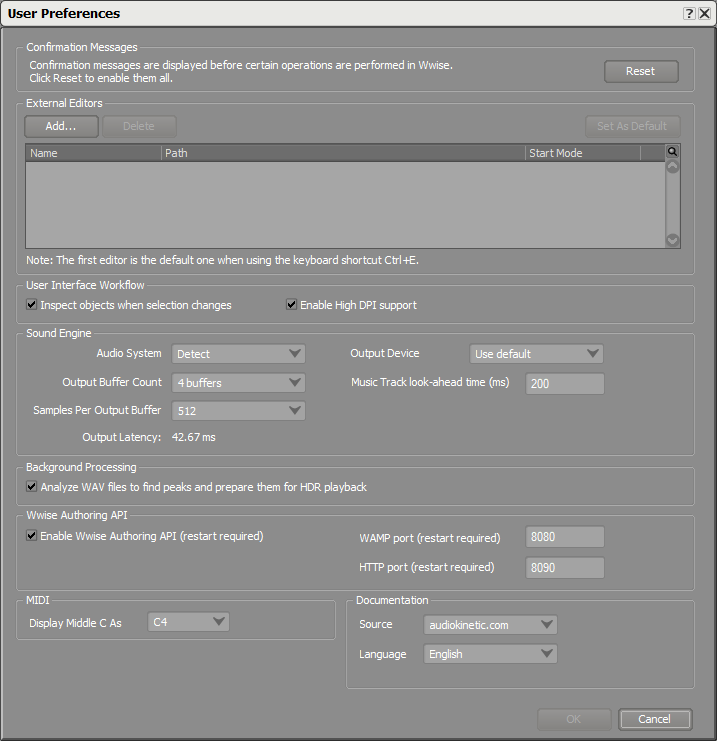
Then open up File>User Preferences and check “Enable Wwise Authoring API (restart required)” like you see in the bottom left below (right above MIDI).
Once you restart Wwise and load back into your project, we can test and make sure that the connection between Node and Wwise is working.
Testing Hello, Wwise
Since he’s super nice, Bernard over at Audiokinetic provided some samples to make it easy to check that your connection with Wwise is actually working. If you’ve downloaded the SDK you want to navigate in Powershell to the directory in the image below. Keep in mind your version of Wwise will likely be different than mine:

If you’ve never done this before, remember that “cd” followed by the directory allows you to change directories at the command line. As a fun cheat, you can type the first few letters of the directory you want and hit tab – Powershell or CMD will auto-fill directory names for you that way!
Now that you’re in the directory, type the following:
node index.js
You should see something like this:
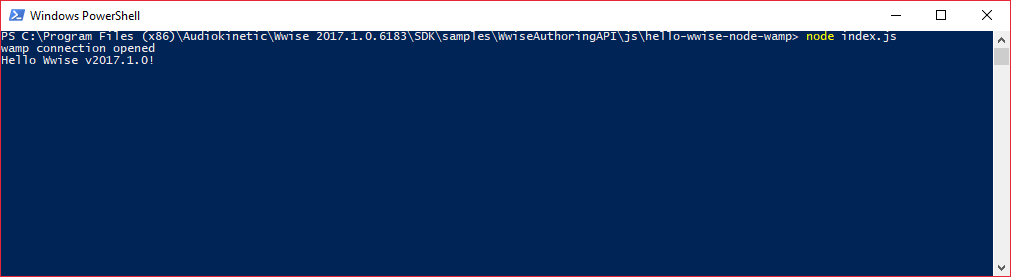
If you don’t see “Hello Wwise v#!” then something is wrong. I would suggest you close Powershell and Wwise, then restart both and try again. Don’t worry – it took me a few times to get it working too!
Explaining how this works
If you’ve successfully got the Wwise connection working, let me first explain in layman’s terms how the WAAPI connection works. If you want more detail, go look in the Wwise documentation as well as at Bernard’s great write up about getting set up.
WAAPI uses WAMP to connect between Wwise and other programs. WAMP is short for Web Application Messaging Protocol. Essentially therefore, communication between Wwise and other programs happens over a WebSocket (or “network”) connection. That means you can have local communication from a program on your computer to Wwise, or you can even have a remote connection from a web browser on a different machine or a mobile app to Wwise! So long as all the ports/connections are set up, of course.
Wwise’s implementation of WAMP uses Autobahn. So if you go look at WAAPI sample code, you’ll notice that it is essentially Autobahn code with Wwise-specific bits thrown in. This useful, as Autobahn is already setup to work with C/C++, Node.js, and Python. Additionally if another language has WAMP support – you can theoretically get it to work with Wwise too.
What we’re going to do now is re-save index.js and edit it so that it pulls the names of the objects you made earlier.
Getting your object names
So open index.js in Notepad++ save it as a new file and edit the middle section of it to look like this:
// Setup handler for connection opened
connection.onopen = function (session) {
 console.log('wamp connection opened');

 var getArgs = {
 from: { search: ['Test'] }
 };

 var returnOptions = {
 return: ['id', 'name']
 };

// Call getInfo
 session.call('ak.wwise.core.object.get', [], getArgs, returnOptions).then(
 function(res) {
 var objects = res.kwargs.return;
 for(i = 0; i<objects.length; ++i) {
 console.log(objects[i].name);
 }
 },
 function (error) {
 console.log('error: ${error}');
 }
 ).then(

function() {
 connection.close();
 }
 );
};
Let me explain this from top to bottom.
First, the way WAMP works in this case is by a call-response method. We need to first know what we want to ask Wwise for, then we call Wwise (literally almost like picking up a phone) and then we wait for a response.
connection.onopen = function(session) – defines a new function that occurs when the connection to Wwise is first opened. At the bottom of the file you see connection.open() – all of what I’ve copied above happens when that connection is opened.
var getArgs = { from: { search: [‘Test’] } }; – is defining a new object called “getArgs”. This is what we’re asking Wwise for. This code syntax is primarily pulled from Autobahn as I stated above, but what it means is “we want something from Wwise, and that is for Wwise to search for any object that includes the word Test in its name”.
var returnOptions = { return: [‘id’, ‘name’] }; – tells Wwise what it needs to respond back to us with. So we’re saying “hey Wwise, I want you to find any object with Test in the name” earlier, now we’re saying “when you find those objects, I want you to give me the ID of that object and its name”.
session.call(‘ak.wwise.core.object.get’, [], getArgs, returnOptions).then( – here we’re telling Node.js to actually pick up the phone and call Wwise. the important part here is ‘ak.wwise.core.object.get’ – that says “call Wwise and tell it that we’re looking to get some objects”. Objects, in this case, can be Sounds, Containers, Events, etc. With this function we’re also feeding Wwise our getArgs and returnOptions variables too.
function (res) { – everything in this block defines what happens when Wwise gives us a response. Rather than re-writing the code I’ll just explain it line by line. First, we make a variable called objects and store in it what objects Wwise found. Second we enter a for loop, and print out one by one the name of each object that Wwise found.
function (error) { – everything in this block defines what happens upon an error ocurring. Essentially this prints out a useful pre-defined error message for us.
connection.close(); – simply closes our WAMP connection.
Running our new program
Now go back into Powershell and type:
node nameofyourprogram.js
You should see something like this:
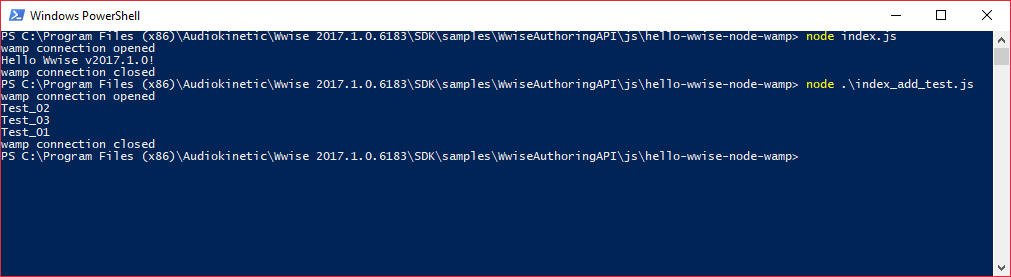
See how Wwise gave me the names of my 3 objects back?! Pretty simple thing, but you can start to see the possibilities of this. Now that I have these objects, I can get any information about them (Volume, RTPC, randomization, events, etc.).
Moving forward
I hope this worked for you! If it didn’t – feel free to ping me on twitter and I’ll do my best to help troubleshoot.
I’m hoping the next example I will have to show you will use the session call ‘ak.wwise.core.object.setName’ so we can not only get the names of our objects but change them as well. Once I get those working back-to-back, I’ll do another post explaining how it works!
Copyright 2016-2021, NIR LLC, all rights reserved.